What the Tormentor is
The Tormentor is a stationary mini-boss that does not attack on its own but reflects damage to every hero nearby. Killing it grants the team a free Aghanim's Shard for the player with the lowest net worth. In short, it is a way to power up a support fast without spending gold on the Shard — and one of the basic habits of players who steadily climb MMR.
Spawns at 20:00, respawns in 10 minutes (cannot be prevented), reflects a larger share of damage to everyone in radius the longer the match runs. Hit it with one tank, keep the rest out of radius, and land the Shard on the right hero.
Timings and where it stands
The Tormentor is tied to a timing, not to chance. Knowing when it appears lets you plan the approach in advance.
- Spawn — 20:00. The first Tormentor appears at exactly the 20-minute mark, by which point cores have items to break it.
- Respawn — 10 minutes. After death it returns in 10 minutes, and that respawn cannot be prevented by anything.
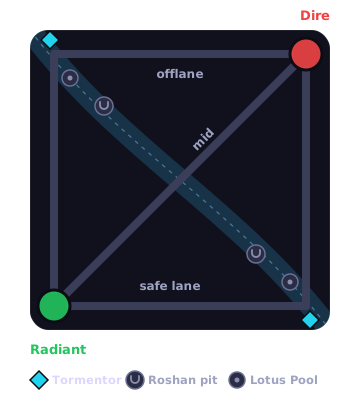
- Only one is active. A single Tormentor is active at a time: it stands in a corner of the map next to the Lotus Pools, swaps sides with the day/night cycle, and always sits opposite Roshan.
- Scales with match time. The barrier and the reflection grow with minutes played, not with the number of deaths — the later you go in, the longer and more painful the kill.
- The pit doors show through fog. Closed means the Tormentor is dead, open means it is back in place. It is the one objective whose clock you can read without scouting: a look at the pit is enough, no ward required.
- Timer by the minimap. Since patch 7.40 the Tormentor has its own timer next to the minimap, just like Roshan, and it can be pinged to call the team.
Where exactly. By day the Tormentor stands in the bottom right corner of the map on the Radiant side, at night in the top left corner on the Dire side; when day and night swap it moves to the other corner. The first one comes at 20:00, which is daytime, so it appears bottom right. Roshan is in the top pit at that moment, and it stays that way all game: the two objectives are always at opposite ends of the map. Since patch 7.41 the Tormentor pit sits on low ground closer to the Lotus Pool, with three stairs leading down: from the pool, from the lane and from the high ground with the Twin Gate. A Watcher stands between the stairs to the Tormentor and to the Twin Gate.
Taking the Tormentor is an objective like Roshan: you do it on a power timing and with vision, by the same rules of tempo control. On the main mini-boss, see the Roshan in Dota 2 guide.
The reward: Aghanim's Shard
The Tormentor's main value is a free Aghanim's Shard. It does not drop as an item into the inventory — it is granted directly to one player on the team.
- Who gets it. The Shard goes to one of the two lowest net worth players who does not yet have one — almost always a support.
- Why it is strong. Supports can rarely afford a Shard with gold; a free one sharply boosts their abilities in fights.
- What the Shard is. An Aghanim's Shard adds a new effect to a hero or upgrades an ability. Details in the Aghanim's: scepter and shard guide.
- Gold for the team. The four players who did not get the Shard receive 175 gold each — 700 for the team; since patch 7.41 the Shard recipient gets no gold. If all five already have a Shard, 415 gold is paid instead.
- An aura after it dies. Where the Tormentor fell, a 900 radius aura lingers for 15 seconds and regenerates 2.25% of max health per second for everyone inside. Do not scatter right after the kill — stand in it.
That is why teams try to take the Tormentor so the Shard lands on the hero who gains the most from it — usually the team's key support. A buffed lineup then converts the edge into map control more easily, including through a split push.
How to kill it safely
The Tormentor is dangerous not for its attack but for its reflection: it returns a share of the damage it takes, split evenly among all heroes within a 1200 radius. The share is tied to match time: 30% plus 1.5% per minute, so roughly 60% at the first spawn at 20:00 and roughly 90% by minute 40. Hitting it with the whole team stacked on top means wounding yourselves.
- Hit it with one tank. A hero with a large health pool or under BKB soaks the reflected damage while the rest stand aside.
- Keep the team out of radius. Everyone not needed for the kill leaves the reflection zone so they take no damage for nothing.
- Place vision. Going for the Tormentor is a perfect moment for an enemy strike; a ward around buys time to react.
- Take it on your timing. Do not go for the Tormentor without items or an advantage — later versions are tougher, and a long brawl at the boss easily turns into a lost fight.
Common mistakes
These slips turn a free Shard into a lost game:
- Stacking all five on top. The reflection is split among everyone nearby — the team damages itself.
- Approaching with no vision. A long brawl at the Tormentor in the dark is an invitation to a five-versus-four.
- Going early with a weak core. Without items the reflected damage kills faster than the Tormentor falls.
- Ignoring it all game. A free Shard on a support is a real power spike; handing it to the enemy over and over is costly.